Here’s a tip on how to cut down music in the magnetic timeline while maintaining sync. In addition, there’s a bonus tip on syncing SFX to the music and keeping it in sync. Understanding the latter what what made FCP X click for me.
Here’s a tip on how to cut down music in the magnetic timeline while maintaining sync. In addition, there’s a bonus tip on syncing SFX to the music and keeping it in sync. Understanding the latter what what made FCP X click for me.
*************************************
Using Roles in FCP X is an incredibly powerful way to tag different components of clips (audio or video, including separate channels) with a designation. Roles are the bridge between a trackless environment and a track(ful!) environment.
Working with Roles allows you to keep your timeline simple, while providing you with powerful flexibility for outputting different kinds of masters.
For example, if you want to export a Textless Master, then you simply need to tag those clips with the Titles Role. When you export a master file, you can choose which roles (video or audio) you wish to turn off (or leave on). In this paradigm, you no longer need multiple timelines for your Texted and Textless Masters. This is amazing!
The same can be said for audio. You now have the power to export the best and most detailed AAFs of any NLE. And in doing so, the timeline never stops looking like the magnetic timeline. It’s all “under the hood.”
As FCP X continues to develop, I hope that we’ll continue to see Roles (or something like them) become a more developed and integrated part of its workflow.
After this last job, I feel that it’s necessary that you add the proper role to every clip upon import. If you import a PSD file with text, make sure it has a “title” role. Another PSD file that doesn’t have text and could end up in the Texted Master could get a “Graphics” role. If you import SFX from the Finder, make sure it has an SFX role. If you import video with attached audio, make sure to designate whether the audio is NAT-SOT or Interview (Dialogue). If you get multi-channel audio, then I recommend each channel get its own Subrole.
The possibilities are immense and this now also requires determining in advance how you wish to tackle your role-tagging strategy. This is much the same way as how you would establish your system for keywording clips before you start to edit.
Here’s a good analogy to explain it. If keywords are to organized editing, then roles are to organized deliverables.
It’s very important that this be worked out in advance of editing since role-tagging is a one-way street. Make the changes in the event browser and they will not show up in your project timeline. Make the changes in the timeline and they will not show up in the event browser. This is probably a good thing as you might have a clip that can be delivered in a multitude of ways in different timelines.
The end-game here is that you put a little prep time in and then you won’t need to do as much work when exporting your project for delivery.
These are the bugs and lacking features that currently make working with subroles and multi-channel audio clips difficult.
Is to turn this disorganized AAF for your sound mixer: 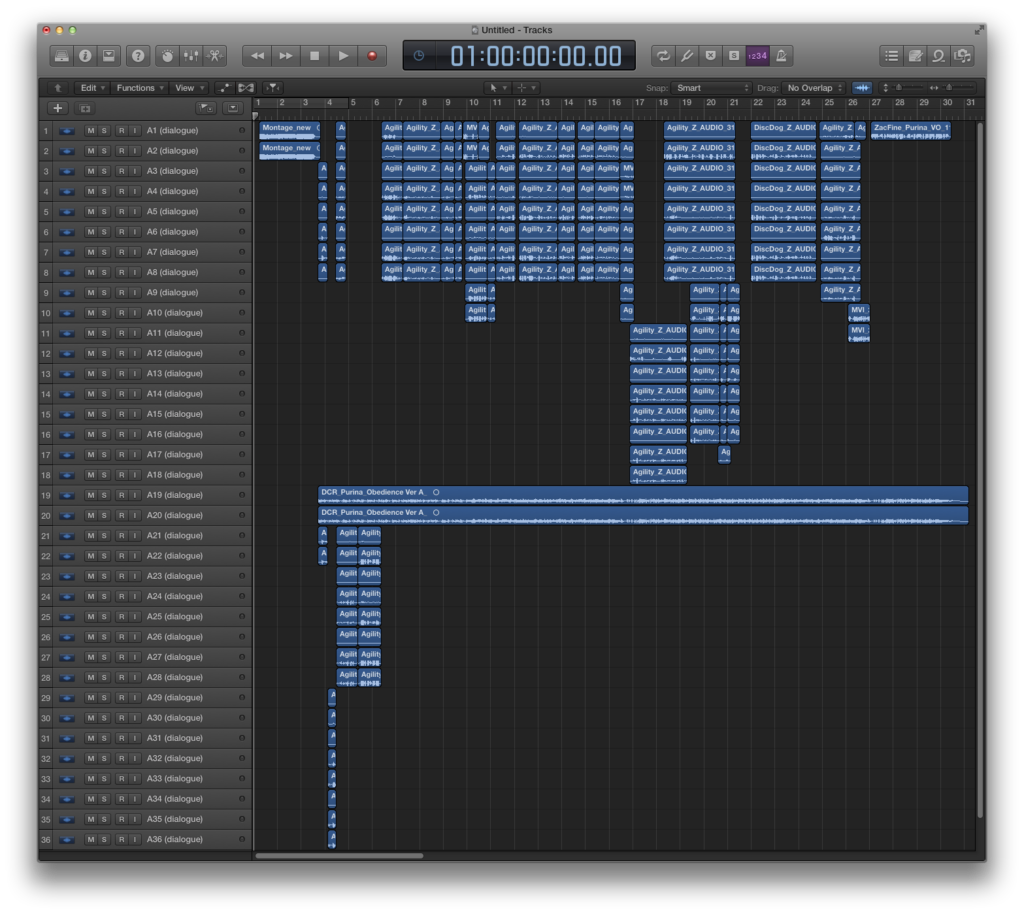 Into this (the most awesome AAF ever):
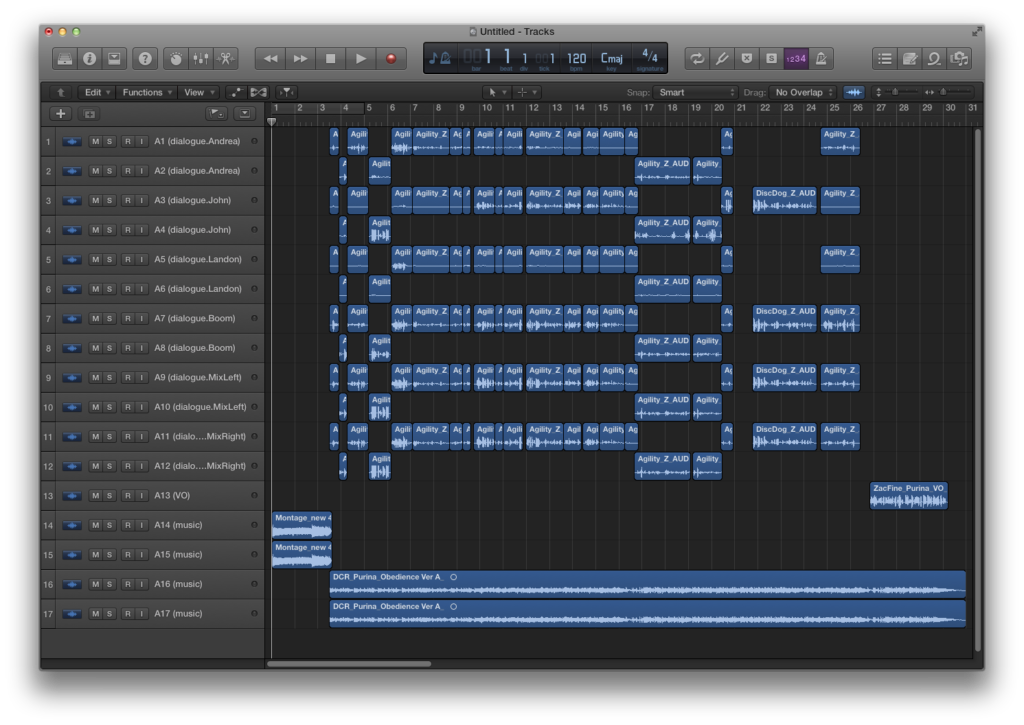 Unfortunately, you are going to need to edit FCPXML to do it.
1. Create a new event and import your multitrack audio and the video that you will be using to sync together. Since this is a shared project, I have chosen to leave Copy Files to Final Cut Events folder unchecked.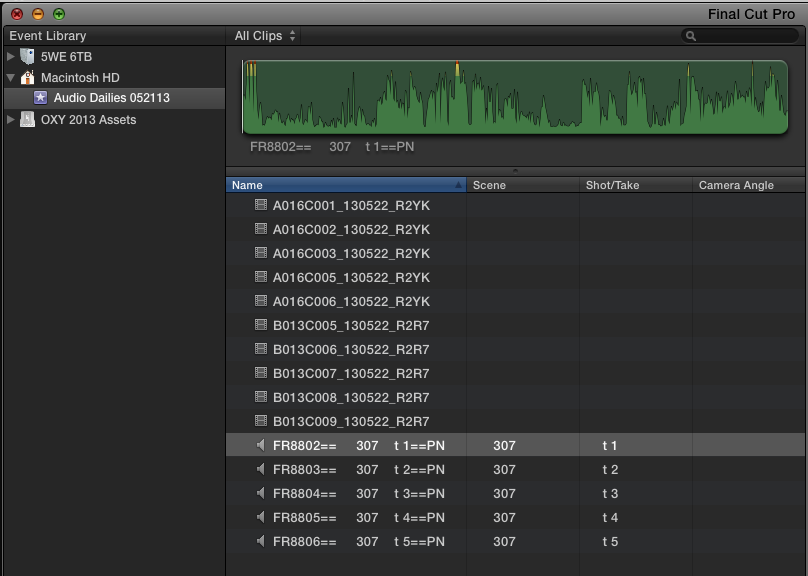
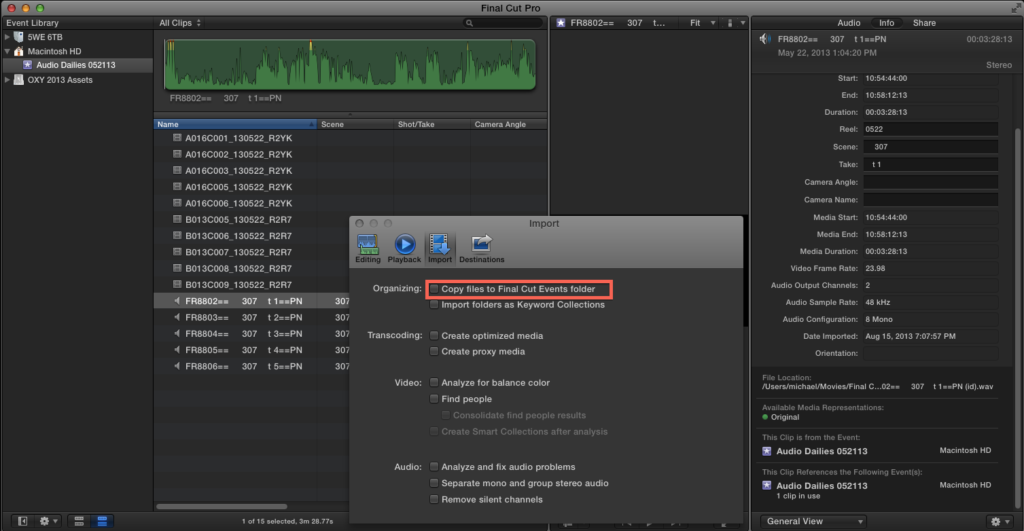 2. In this scenario, I have imported 8-channel audio. Notice that FCP sees it as 4 Stereo.
2b. Please note that the clip is actually 8 Mono Channels, as seen here in Wave Agent. Also note that the sound recordist diligently and correctly logged the channels in the bottom right.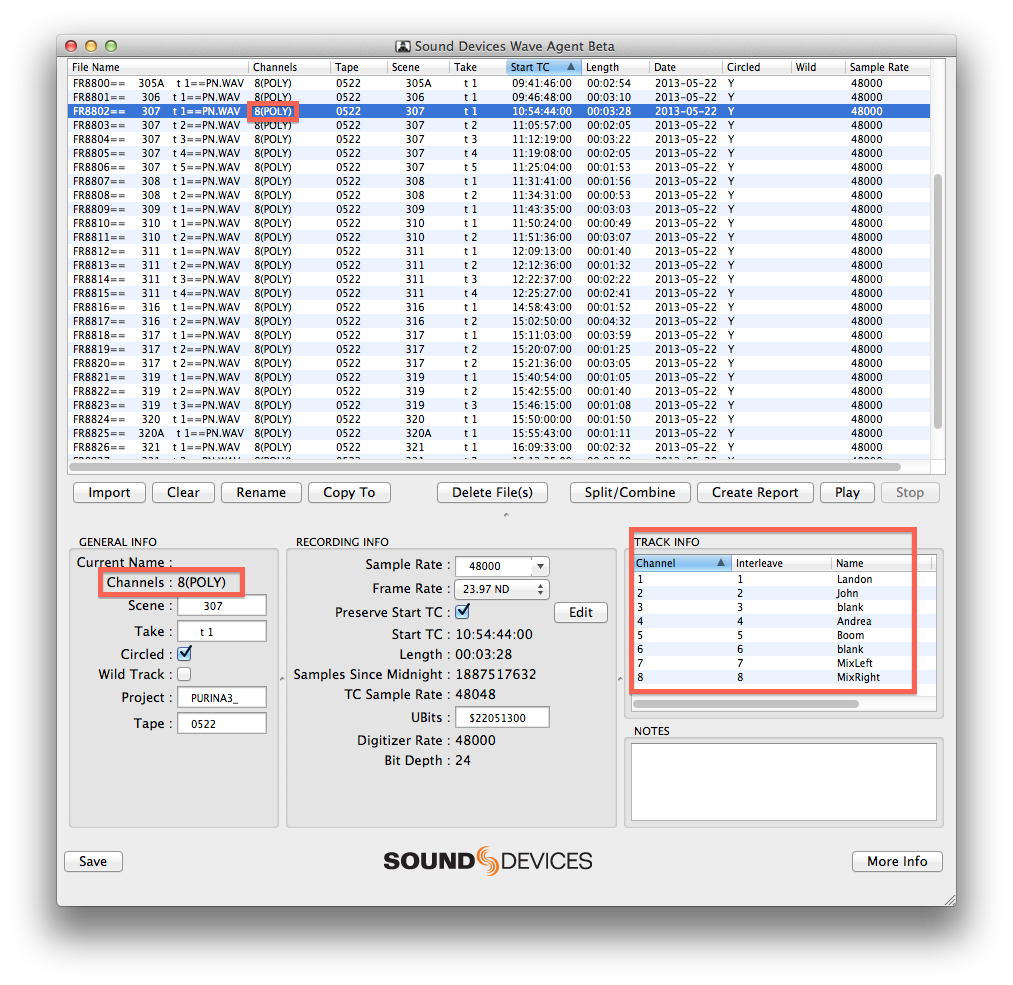
3. Change the channel designation of all the clips to 8 Mono (or 2, 4, or 16, based on your WAV files).
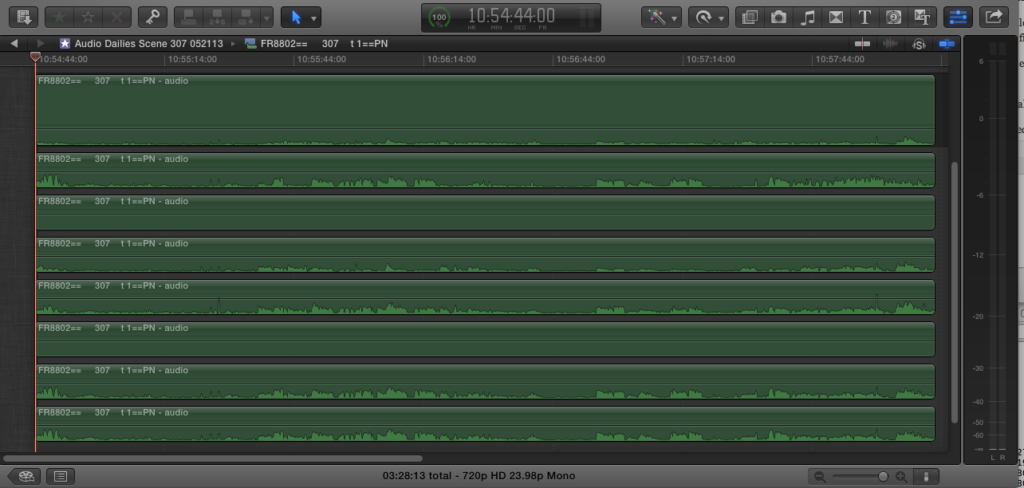
4. You don’t have to do this step. But just to show you that there is a bug here, right click on the audio clip and select “Open in Timeline.” Note that there are 4 stereo channels, not 8 Mono.
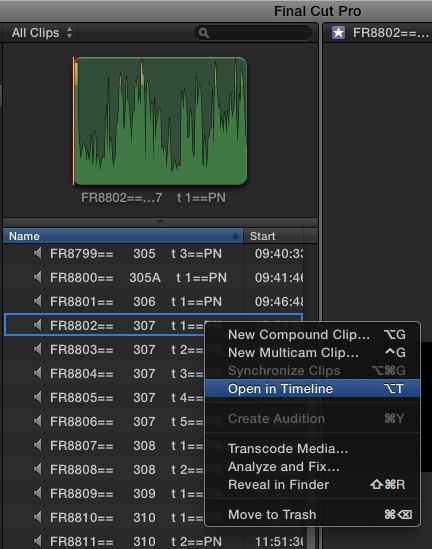
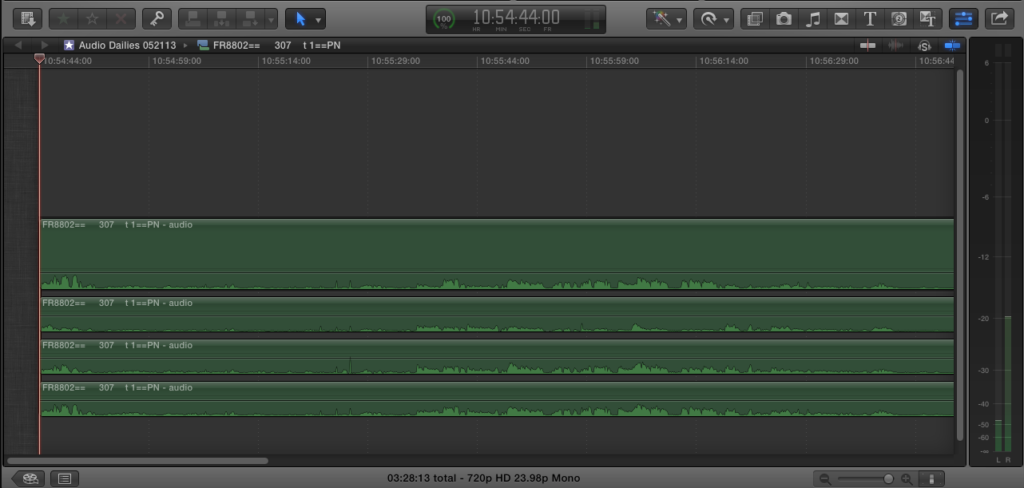
4. Export an FCPXML. Since I’ve been doing so much with XML lately, I set up CMD-OPT-E to export XML and CMD-OPT-I to import XML in the keyboard editor.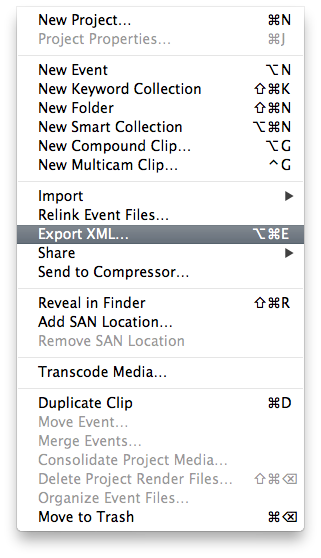
5. Open the file in your code/text editor of choice.
6. Find the lines of code that refer to your audio clips. They start with “</clip name=…”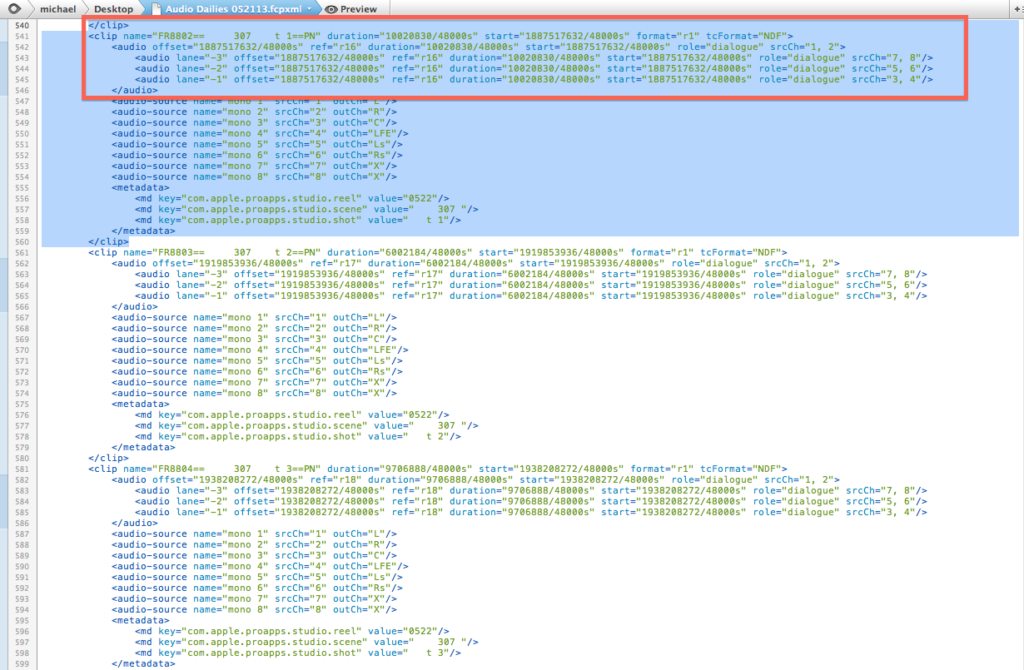
Even though you set the file to 8 Mono channels in FCP X, the code here continues to show them as 4 Stereo, but with 8 channels in some sort of strange 5.1 + 2X audio configuration. We are going to fix that now.
8. You will need to edit the code manually. This can be dangerous, so proceed with caution. I must stress that I have not taken a job from import through final mix using this procedure. All my tests show that this works, but I cannot be held responsible for any unforeseen issues. Last, if you want to add subroles to the clip’s channels, read step 9 before proceeding with step 8.
Here’s my edited code for this particular clip. You will need to make yours reflect your clips. THIS DOES NOT INVOLVE JUST COPYING AND PASTING. Although that can be part of it. It takes about 15-20 seconds per clip once you get going. Just remember, any mistakes in formatting or, well, anything, will cause the XML to not import into FCP X:
<clip name=”FR8802== 307 t 1==PN” duration=”10020830/48000s” start=”1887517632/48000s” format=”r1″ tcFormat=”NDF”>
<audio offset=”1887517632/48000s” ref=”r16″ duration=”10020830/48000s” start=”1887517632/48000s” role=”dialogue” srcCh=”1″>
<audio lane=”-2″ offset=”1887517632/48000s” ref=”r16″ duration=”10020830/48000s” start=”1887517632/48000s” role=”dialogue” srcCh=”2″/>
<audio lane=”-3″ offset=”1887517632/48000s” ref=”r16″ duration=”10020830/48000s” start=”1887517632/48000s” role=”dialogue” srcCh=”3″/>
<audio lane=”-4″ offset=”1887517632/48000s” ref=”r16″ duration=”10020830/48000s” start=”1887517632/48000s” role=”dialogue” srcCh=”4″/>
<audio lane=”-5″ offset=”1887517632/48000s” ref=”r16″ duration=”10020830/48000s” start=”1887517632/48000s” role=”dialogue” srcCh=”5″/>
<audio lane=”-6″ offset=”1887517632/48000s” ref=”r16″ duration=”10020830/48000s” start=”1887517632/48000s” role=”dialogue” srcCh=”6″/>
<audio lane=”-7″ offset=”1887517632/48000s” ref=”r16″ duration=”10020830/48000s” start=”1887517632/48000s” role=”dialogue” srcCh=”7″/>
<audio lane=”-8″ offset=”1887517632/48000s” ref=”r16″ duration=”10020830/48000s” start=”1887517632/48000s” role=”dialogue” srcCh=”8″/>
</audio>
Now rinse and repeat. You must do this for every clip. For the sake of this article, I’ll only be doing this for Scene 307, Takes 1-5.
10. If you want to add a subrole tag based on a type of mic (lav, boom) or a character name because your sound files don’t have the channel metadata embedded, you can change the role name in the XML at this stage. I recommend making the subroles based on the primary Dialogue role. To do this, add a period between the word “dialogue” and “your_subrole.” For example, you would change the role heading to “dialogue.lav” or “dialogue.john” etc…
I will not be doing this since my clips were logged by the sound recordist. Sync-N-Link can read this data.
11. Save the file. Go back to FCP X. For this step, you should definitely uncheck “Copy Files to Final Cut Events Folder.”
12. Import the FCPXML. This is ONLY to check the file. Do not re-export an FCPXML from this event. You are going to delete this. 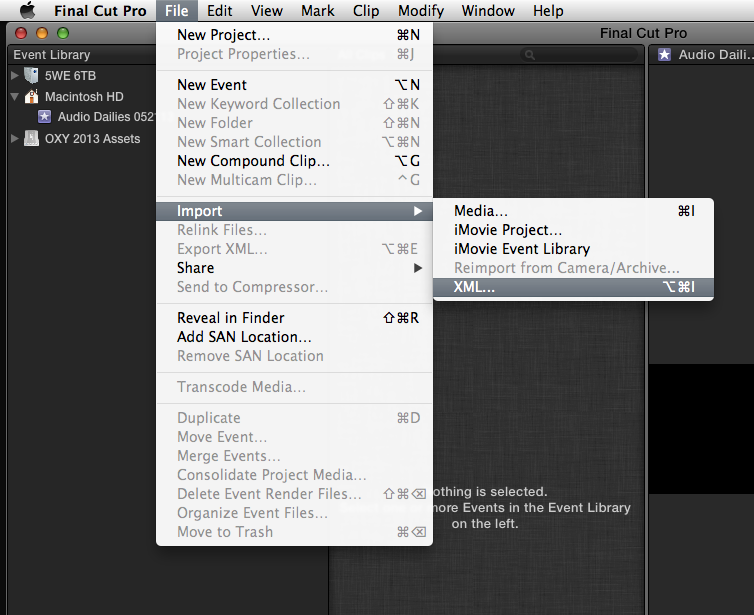
12a. Go through all your clips to make sure they are seen as 8 Mono and that they have the proper channel names. If you open the clips up in their own timeline, you should see 8 channels. If everything checks out, then DELETE the event. You don’t need it. 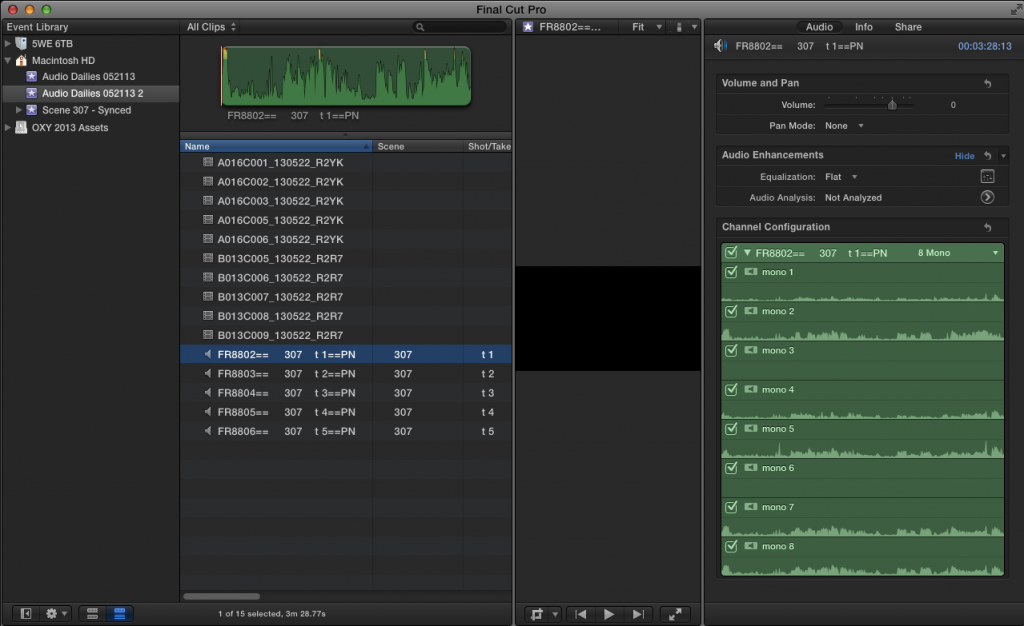
13. Open Sync-N-Link. Assuming your WAV file has the proper channel designation, I highly recommend turning on “Use Track Names from audio for Subrole Names” and “Use Subrole Names for audio component names” to set the track names and subrole names. Note that S&L sees the file with the proper 8 channels. If you had imported the original FCPXML, then it would only see 4 channels because that’s how the code designated the file. This is why we edited the FCPXML earlier.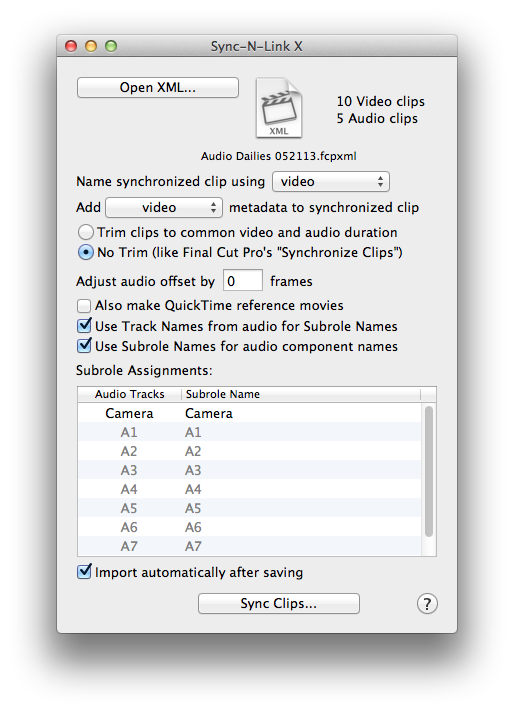
14. Click “Sync Clips…” Let Sync-N-Link do it’s thang. It should now “automagically” import the new synced event back in to FCPX. Your clips are now properly synced.
15. Create a new project and open the timeline.
16. Add one of the synced clips to the timeline. Now expand the clip components (cmd-opt-s). In the inspector, go to the info tab and make sure you are in the General View. For every clip component you select, the role will change to reflect the subrole. In this case, “Landon” is selected.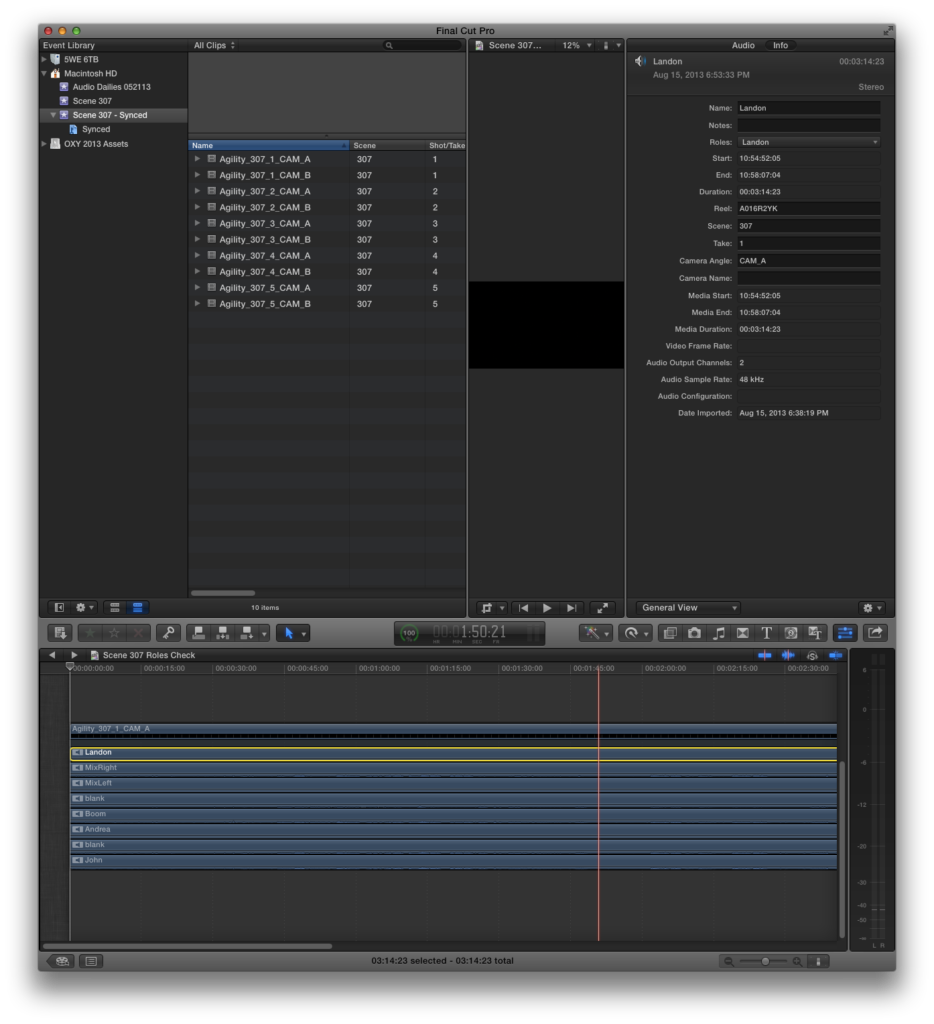 17. Another way to double-check that this worked is to open the Timeline Index (cmd-f or cmd-shift-2). Click on the Roles tab. Expand the Dialogue role by double clicking on it or hovering until the word “show” appears. The channels that have the subrole tagged on them will highlight when you click on them in the Timeline Index.
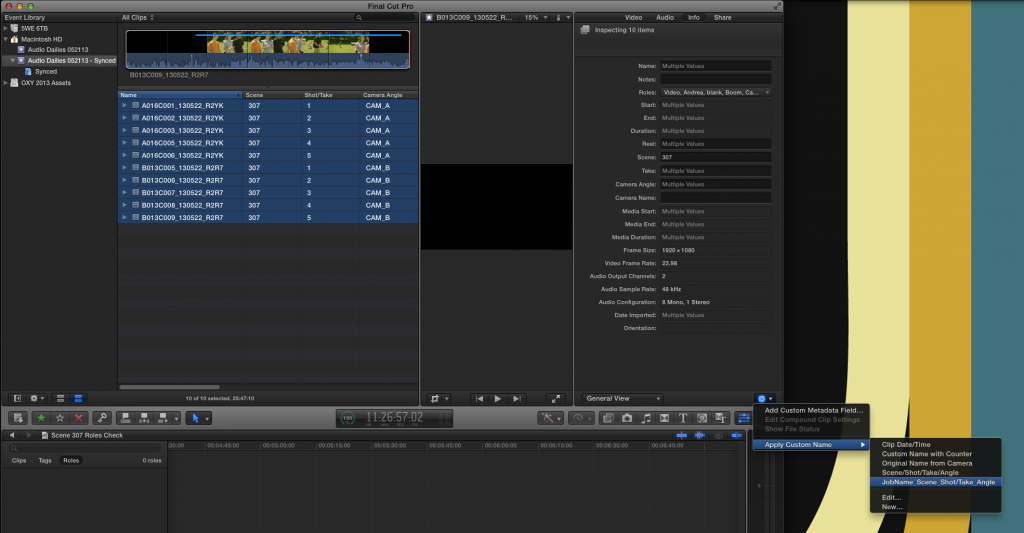
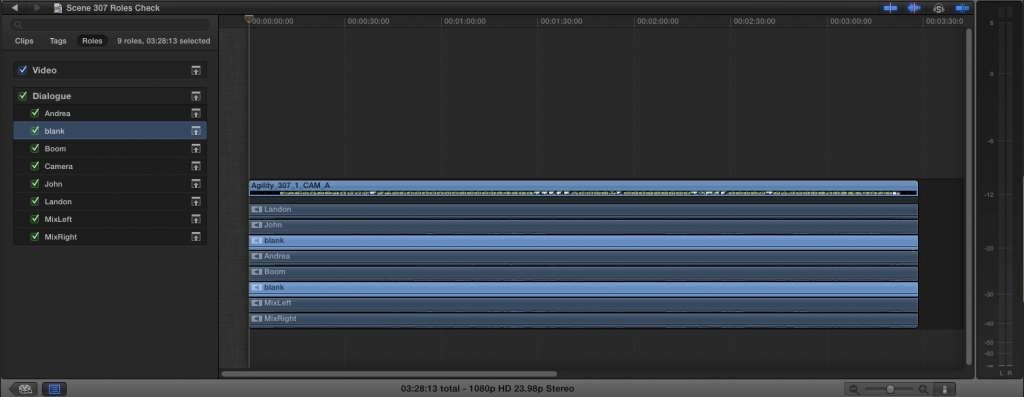 18. You have the choice to add scene metadata and rename your synced clips. Since I’m creating multiclips, It’s imperative that I do this, now. For this job, I renamed them based on JobName_CameraAngle_Scene_Take.
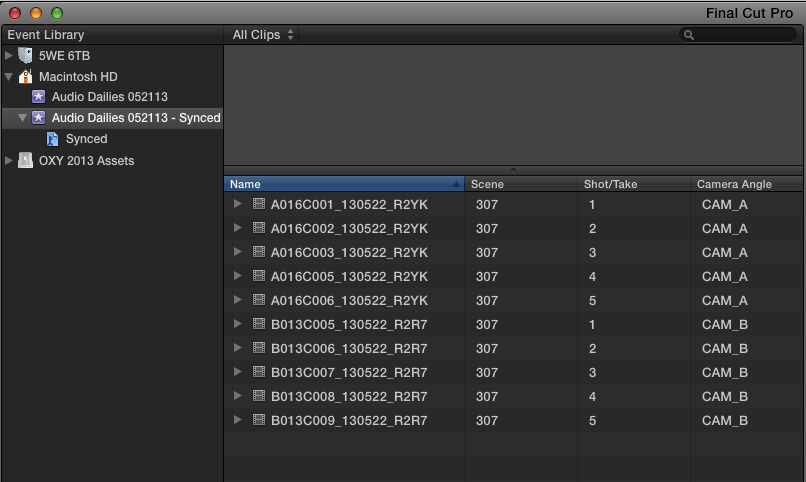
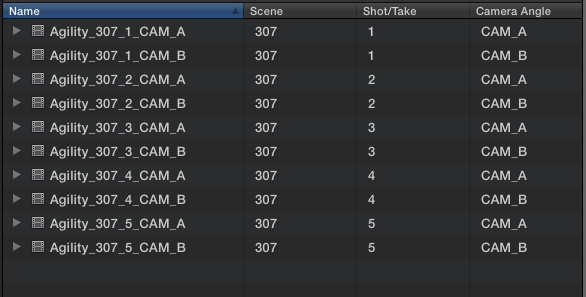
19. Select the clips, right click and create a new multiclip. If the timecode all matches, you could probably turn off “Use audio for synchronization.” Again, it’s up to you. Trial and error.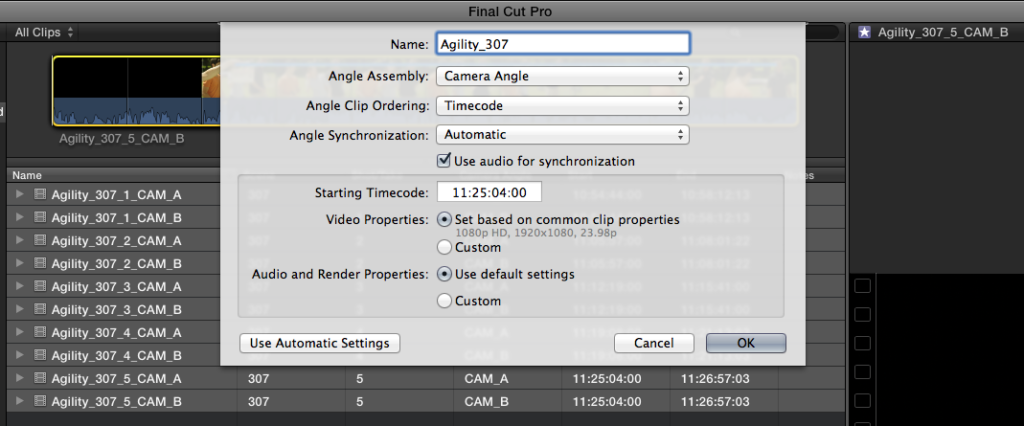

20. While the clips inside the multiclip have the correct channel names and subrole tags, sometimes the multiclip, itself, loses that info. Thankfully, it’s easy to get back.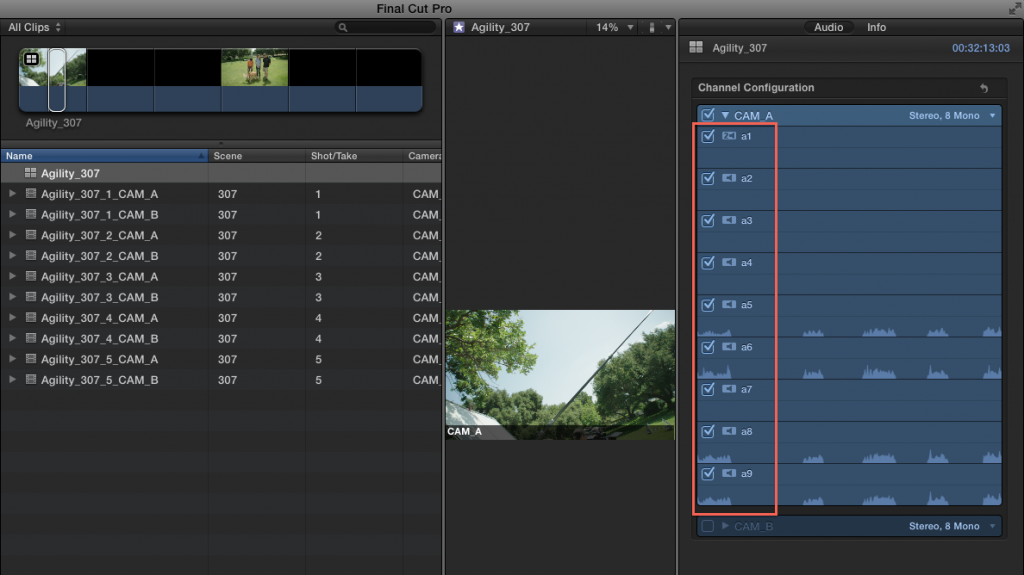
21. Select the multiclip. In the audio tab in the inspector, select the channel configuration info and then select “reset.” That should bring it back.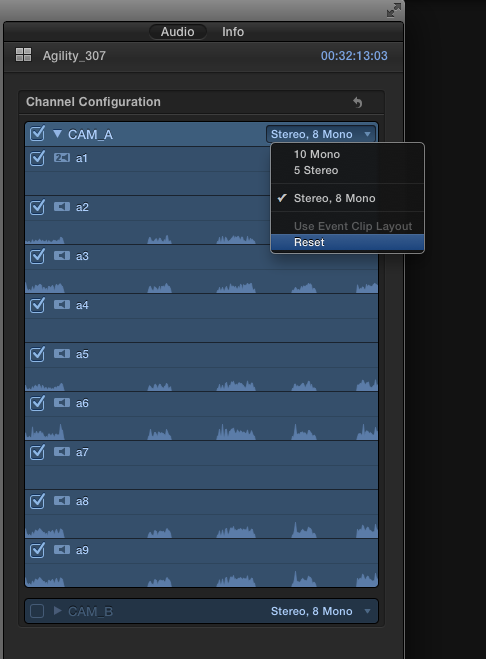
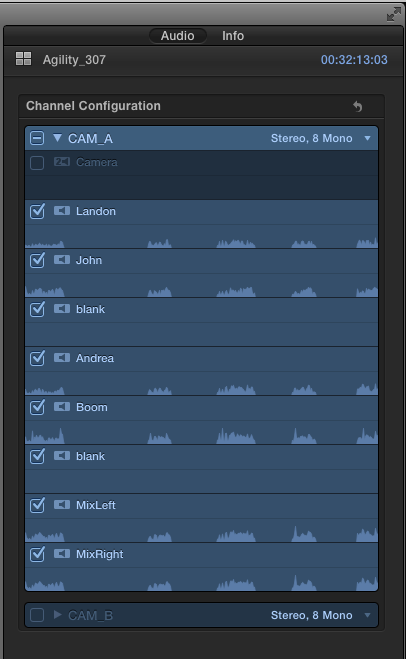
Great! We’re done! Let’s start logging and editing!
Oh wait, there’s still the issue of that other bug — remember Issue C from the top of the post?
Unfortunately, there’s no way to squash that one, but you can put on some bug spray to avoid it. It’s simple, but annoying.
1. DO NOT DO THE FOLLOWING. Do not expand components and turn off unused channels with the V key. This could cause your timeline to come to a screeching halt. 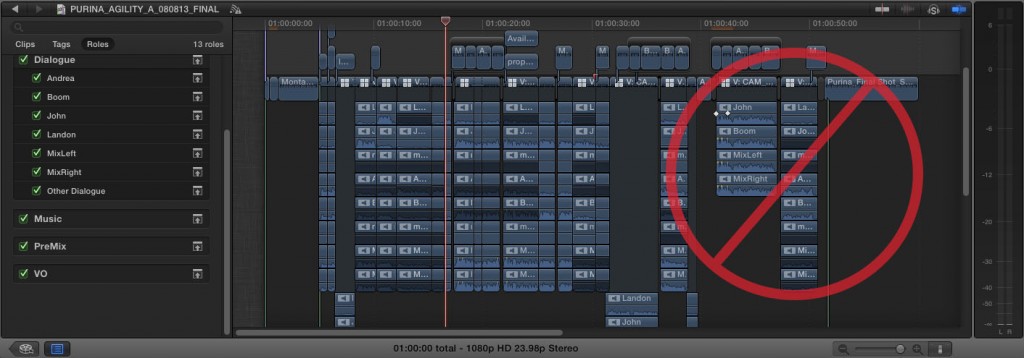
2. Only use the inspector to turn off/on audio components. While editing in the timeline, make sure that every time you add a clip you turn off all irrelevant channels using the inspector. The more and more channels you place into a timeline, the slower it will get. Keeping 2 channels-per-clip active is a good start.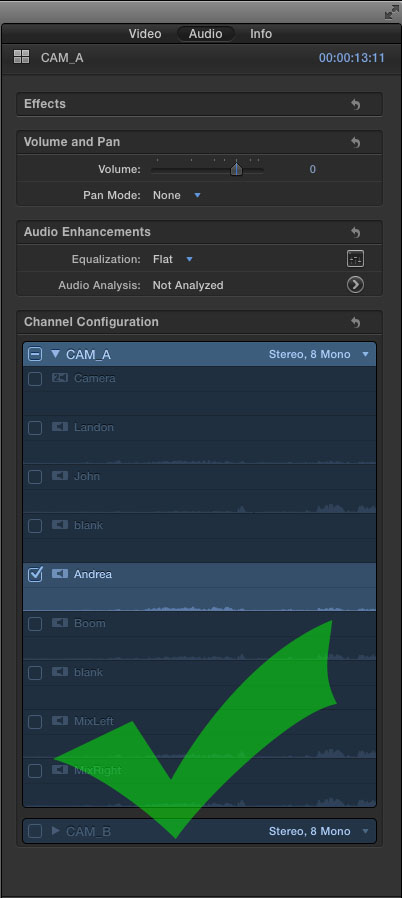
3. On my last job, I was editing with a ton of multiclips with a mix of 5D and Alexa footage. I also believe the 5D footage was also causing major slowdowns and stalls, so I had to remove them from the multiclips. Another unfortunate bug.
Ok! That’s all for this insanely long post. Have a happy edit. Hope this works for you (and me!)